Customizing Jekyll's Default Theme
Jekyll installs with a nice, clean theme, called Minima. While there are a lot of nice themes out there, I had both a clear view in my head of what I wanted to accomplish, and ample time thanks to CoVid19. So, armed with Minima’s source and Jekyll’s documentation, I decided to have a go with modifying the theme a bit, and in this post I’ll try to outline the way I went about it.
I started off with the latest version of the Minima, even though it’s not published as a stable version, and is not what you get ‘out of the box’ when you get when you start a new site with the jekyll new <PATH> command. The main reason for that was that I had more of a desire for understanding how Jekyll themes were built, rather than a ‘getting the job done’ approach. So, I cloned the theme from its Github repository, and started to modify the way things looked and felt, to better fit my desired look and feel. If you’d like to follow along, you would need to change your Gemfile to point to Minima’s Github repository, like so:
gem "minima", :github => 'jekyll/minima' # github v.3.0, latest build is 2.5.1
Set your theme on your _config.yml, then run bundle from the command line.
Design goals
I wanted my site to maintain the general look and feel of my existing WordPress blog, which uses the WordPress team’s Twentythirteen theme.
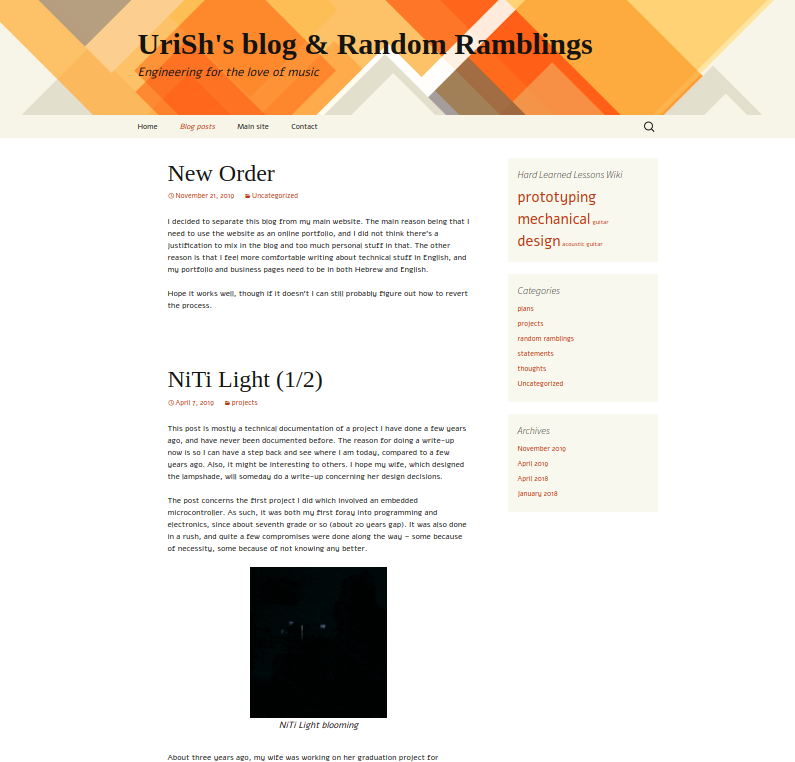 My existing WordPress blog
Starting with the general layout of this theme, I wanted to have a header that will showcase the site’s name, some subtitle with the site’s motto, a logo, and to have all that in front of some colorful banner. I grabbed the banner straight from the WP theme I was using, re-designed my site’s logo, and started working on the layout.
Modifying Minima
Minima’s latest (unreleased) version, v.3.0, has got some nice features for easy customization. It imports some empty files while rendering both the theme’s default.html layout as well when compiling Sass (.scss) files. This complements Jekyll’s [theme building process]](https://jekyllrb.com/docs/themes/) nicely, as it allows the user to only modify what’s needed, without needing to copy and paste whole files. I found out that worked great with styling, but needed to make quite a few changes in the _includes HTML files, since there was no easy way for changing the page layouts themselves without that.
You can click on the filename in the headings to go to the file the paragraph describes.
Modifying _includes
custom-head.html
This file is really all you need to change if all you want is a slightly different look and feel, and some basic branding. This file is included in the <head> section in the generated site, so including a favicon, for example, is perfect here. I decided to change the fonts, so I grabbed the cdn link from Google fonts for two fonts I like (and used on my old site) - Alef and Tinos. These two fonts were originally selected since they both support Hebrew as well as English (and other European languages), though I don’t intend to implement Hebrew on this site in the near future. I just sorta got used to them in my old site, and decided to keep them.
Those fonts will simply override Minima’s default font, by reassigning some variables in _sass/minma/custom-variables.scss
header.html
Starting off from the top of the page, the branding for my site consists of a banner, which features my name, a subtitle, the site’s logo, and a navigation bar. Those are all inserted through Liquid tags, pulled from either Jekyll’s _config.yml, or from the Jekyll’s structure.
The banner itself is a css background, using Liquid to insert a relative URL from the site’s assets folder:
<header class="site-header" style="background-image: url('{{ site.banner | escape | prepend: "/assets/img/" | relative_url }}');">
Then, inside a banner HTML class, the template checks if there’s a site.logo image in _config.yml, which (if it is configured) is inserted as a relative URL to the site’s assets folder again.
<div class="img-container">
    {% if site.logo %}
        <img alt="logo" src="{{ site.logo | escape | prepend: "/assets/img/" | relative_url }}"/>
    {% endif %}
</div>
After that, the site’s title and subtitle are also pulled from _config.yml:
<h1 class="site-title">
    <a rel="author" href="{{ '/' | relative_url }}">{{ site.title | escape }}</a>
</h1>
<h2>{{ site.subtitle | escape}}</h2>
The navigation bar remains unchanged in it’s structure from Minima’s.
footer.html
I added a copyright symbol (©) and the year to my site’s footer (the year was also added to _config.yml):
<li class="p-name">© {{ site.author.name | escape }} {{ site.author.copyright-year | escape }}</li>
social.html
I changed the included assets/minima-social-icons.svg to include an icon for Hackaday.io. Technically, the icon I included is for Hackaday.com, but I think it’s the more easily recognizable of the two.
To add it into my social icons, I simply added a single line to the list of social icons, which displays the Hackaday icon with the appropriate link, if it is configured in _config.yml:
{%- if social.hackaday -%}<li><a rel="me" href="https://hackaday.io/{{ social.hackaday | cgi_escape | escape }}" title="{{ social.hackaday | escape }}"><svg class="svg-icon grey"><use xlink:href="{{ '/assets/minima-social-icons.svg#hackaday' | relative_url }}"></use></svg></a></li>{%- endif -%}
Adding the icon for Hackaday.io
I used ntembed’s Hackaday social media icon, and simply added the svg to Minima’s assets/minima-social-icons.svg using Inkscape. As I wrote above, the icon is actually for Hackaday.com, but that was good enough for my purposes.
I then added hackaday: UriSh (which is my username on Hackaday.io) to Minima v3’s social_links: category, under minima:, in Jekyll’s _config.yml. You can have a look at a sample _config.yml file here.
Modifying _sass/minima
Minima’s latest version (v.3.0) provides a few skins, to change it’s color scheme. It also, as I wrote above, gives the user hooks to modify the theme further. This is achieved by importing a couple of empty scss files, one right after some initial variable assignments, then another after most of the site’s styling is defined.
I set up the Minima’s skin to be skin:solarized, in _config.yml under minima:.
custom-variables.scss
In this file one can override Minima’s defaults by reassigning certain variables. It is also possible to add custom variables, which I needed for controlling the position and styling of the navigation bar’s look and feel.
I first overrode the default font for the site and adding a second font for headlines, using the fonts I linked to in _includes/custom_head.html, Alef and Tinos.
I added a couple of navbar definitions, for background color and hover effects, linking them to Minima’s skin definitions, and I also added a couple more breaks for size, since I found out my subtitle was too long to handle the banner / navigation bar properly.
custom-styles.scss
This file contains the styling for the site’s branding, as well as the styling for other layouts I will cover in future posts.
First, I wanted to style code on my site in a way that will contrast the styling of other text in my site, to make it a bit more discernible. I did that by importing a stylesheet I got from the repository recommended in Jekyll’s docs.
@import url('zenburn.css');
Next, I defined the headings’ font to use Tinos, and since I decided to override Minima’s skin code highlighter defaults, I also redefined the highlighted area to fit.
After that, besides importing some useful mixins, comes the actual styling for the site’s header, banner, logo, and navbar.
Since this is quite a long list of changes from Minima’s header, I will only list a few, and if anyone’s interested in investigating further, the file is hosted here, or leave me a comment down below.
I set the area for the banner (the background image defined in header.html) under the class .site-header:
background-color: $brand-color-light;
background-size: cover;
background-position: center;
min-height: 14.1vw;
The min-height attribute is defined to fit the WxH ratio of the banner image I used.
Next, the .banner class defines the styling for the logo, title, and subtitle.
The .top-nav class then defines the navbar, including background, position, and hover behavior.
The class .site-title overrides Minima’s default by disabling float and hover decoration.
The .site-nav class and its subclasses control the behavior of the navbar further, including it’s alignment according to window size, and also highlights and disables the link for the current page. \
One thing I found important while styling my site was setting the correct breaks for window width. I added a couple more @media queries under .site-title:
@media screen and (min-width: $on-med-wide) {
    top: unquote('calc(max(14.1vw, 165px) - 1.6rem)');
}

@media screen and (min-width: $on-medium) and (max-width: $on-med-wide) {
    top: unquote('calc(max(14.1vw, 200.25px) - 1.6rem)');
}
to allow for better positioning of the navbar, while letting the banner grow in height to fit the long subtitle I chose.
Conclusion
Styling Minima v3 to follow an existing WP theme is quite straight forward mostly, though I did get into some ruts.
Mostly, it’s a matter of moving overriding existing definitions, and figuring out what class an element is in, in order to change it’s behavior in a couple of .scss files Minima imports by default.
Most of this work has been done in preparation for a more elaborate change I needed to implement, which is adding a portfolio page to this site. One of my next posts will be on that subject, as it was the driving force for moving from WP to Jekyll, even though it might not seem like an obvious decision.
You can find a ready template that includes the above changes I made to Minima in Jekyll-portfolio, which also includes the portfolio page and static commenting.
If anything above is not clear, or if you find you have better ways to do what I outlined here, or if you find the template repo useful, please leave a comment.